

How To Repair Th400 With No Forward Gears
Tech back up hotlines have been burning up for years with phone calls apropos rapid gear railroad train failure in GM TH400 transmissions after routine rebuild or repair. It's time to accost the issues that cause this and opposite widespread confusion surrounding gear train setup on this and similar units. Today nosotros will articulate upwards the mystery in setting proper endplay for this transmission. If tolerances are not correctly gear up, costly comebacks can result. Agreement these basic checks on the TH400 will requite you groundwork noesis in setting build procedures that will be used with similar gear sets, such as 4L80-E.
What causes these gear railroad train failures? It often begins with a component replacement, whether irresolute a stock part or installing an upgrade. Equally parts are being replaced, taking time to gear up endplay is necessary, but we meet trouble here because of incomplete OE reference information.
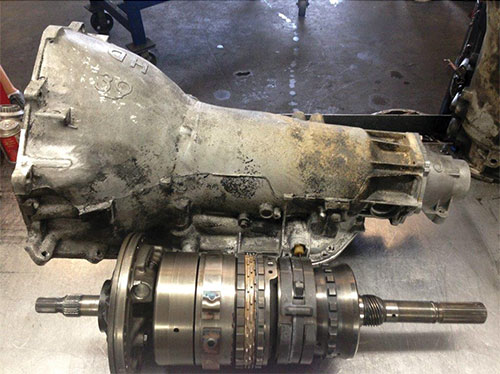
The TH400 (Figure one) has four endplay tolerances (NOT to be dislocated with clutch clearances) that should be examined and corrected during repair. Even so, GM'due south published rebuild procedure only references ii of them! With two endplay tolerances being ignored, you can imagine why these meltdowns are occurring.
| Effigy 1 |
|---|
 |
The post-obit four areas should be checked and corrected; the concluding two are not referenced in OEM material.
- Rear Endplay – Sets up from centre of case to superlative of rear case selective plate.
- Front Endplay – Sets up betwixt top washer of Forward clutch hub and selective pump washer.
- Front to Rear Planetary Endplay – Of import with irresolute torque load.
- Frontwards Clutch Hub to Directly Clutch Drum Endplay – Measured between the Forward clutch hub and directly clutch drum as they are assembled on their respective shafts. Very of import, despite being omitted from OEM reference.
Permit'south look at these more than closely.
Rear Endplay
The components involved with rear endplay are (from centre of case back):
- Center support forth with tiptop sun gear needle bearing set
- Sun gear/direct clutch pulsate shaft
- Sun gear
- Bottom lord's day gear needle begetting set to top of rear planetary ring gear
- Bottom of rear planetary ring gear to pinnacle of output shaft needle bearing set up
- Output shaft and bottom of output shaft (iv-tab washer)
- Selective washer at lesser of case
The selective washer at the bottom of the example has tabs to lock into and secure against the rear of the case; these tabs likewise place washer thickness.
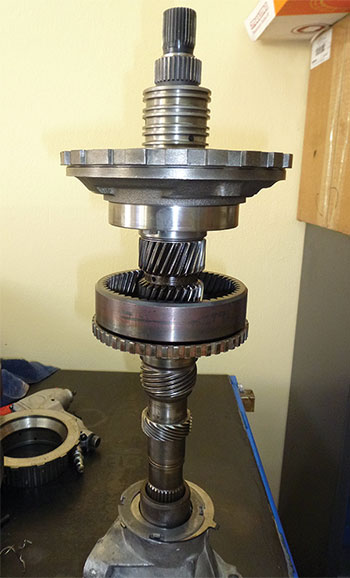
Checking rear play is easier to manage if the planetary assemblies are left off (Figure 2).
| Figure 2 |
|---|
 |
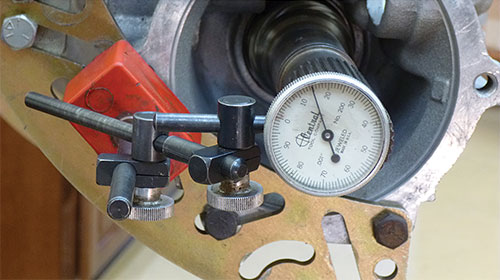
The rear gear train must be installed into the case and secured with a snap ring on the center support. Mount a dial indicator at the rear of the case to mensurate the movement of the output shaft, ensuring it moves freely in and out. With the shaft pushed confronting the washers, cipher the dial indicator and move the associates in the reverse direction to get your measurement (Figure 3).
| Figure 3 |
|---|
 |
Rear endplay needs to be .007" to .019". If out of specification, the selective washer must be replaced with an appropriate washer (Figure four).
Figure 4:Rear Unit Selective Washers | ||
|---|---|---|
| Washer Thickness | I.D. Notches | I.D. Numeral |
| .074 - .078" | None | 1 |
| .082 - .086" | Side 1 Tab | 2 |
| .090 - .094" | Side 2 Tabs | 3 |
| .098 - .102" | End one Tab | four |
| .106 - .110" | End ii Tabs | five |
| .114 - .118" | Stop 3 Tabs | six |
It is vital to check the 3 needle begetting sets and their seats in the rear gear assembly, as clothing here will affect clearances. If worn excessively, needle begetting sets are available in the aftermarket.
During rear gear train assembly, ensure the sun gear shaft and lord's day gear are both assembled properly; if installed incorrectly, it will touch direct clutch drum settings. Proper associates will leave the long splined end of the shaft mated to the flat side of the sun gear, not the askew side (Figures v & 6). If there are no alignment splines machined into the gear and shaft, ensure the lube hole in the shaft lines up with those on the gear.
| Figure five | Effigy 6 |
|---|---|
 |  |
Front Planetary to Rear Planetary Play
While at that place is no reference to this clearance in repair manuals, setting it correctly adds durability and life to the gear sets. The right endplay here will forbid excessive fore and aft motility under torque, preventing wear and quenching gear noise.
Get together the rear gear sets as you would to install them in the case, including the center support. Use a suitable property fixture to secure the assembled gear set upright (a vice works well). It is virtually impossible to get a dial indicator ready here, so we are going by "experienced feel" in this case. Lift up and downward on the top planetary to eye support (Figure 7). If excessive play is discovered, this clearance can exist adapted by using a selective four-tab washer between the gear sets. Fix this up between most .008" and .015", with .010" being the sweet spot.
| Figure 7 |
|---|
 |
Forrad Clutch Hub to Directly Clutch Drum Play
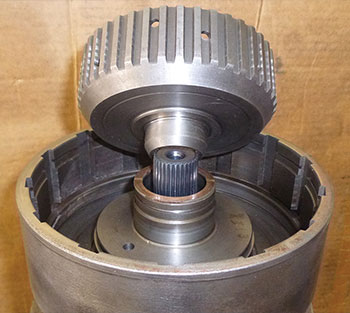
With the gear set assembly still secured in a vice, set the direct clutch drum on the assembly, ensuring it is fully seated on sun gear shaft (Figure eight).
| Effigy 8 |
|---|
 |
Install the washer that sits between the hub and the pulsate, so set hub on the support shaft and concur it tight. Elevator up on the drum to cheque for clearance between these two rotating pieces; nosotros're looking for .008" to .015" here. If no clearance is found, use a thinner washer. If excessive clearance is found, employ a thicker washer, bachelor in the aftermarket.
If clearance is greater than .020" and the thickest washer is being used, in that location are misassembled components or worn parts that were disregarded. WARNING: If there is improper clearance between these 2 assemblies, you will have aggressive wear and failure of the gear sets!
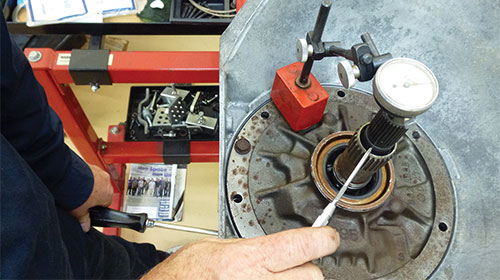
Front end Endplay
Proceed this uncomplicated and fast past leaving out the clutches of the Forward drum and holding back on installing the direct drum into the case until you have checked the front endplay.
With the dorsum of the instance assembled up to the intermediate clutches (secured with snap ring), prepare the Frontwards hub in position. Install the washer that goes between the top of this hub and the Forward clutch drum. Rest the Forward drum (empty) on top of the hub. Place the pump gasket in the case so we don't overlook its thickness. Leave the condom seal ring off the outer side of the pump and fix the pump in place (secure with one bolt, finger-tight). Use your dial indicator to measure the up and downward movement of the input shaft (Figure 9).
| Figure 9 |
|---|
 |
The washer between the pump and Forrard drum is selectable; to assistance gain tighter tolerances, there are other thicknesses available in the aftermarket (Figure 10). When adjusting concluding front end endplay, fix information technology .002" to .005" looser than the rear play. For example, if rear endplay was to have measured .010", you would prepare the front play around .012" to .015". This will allow for forrard movement of the rear gear set up while avoiding making the front too tight.
Figure 10:Front Unit Thrust Washers | ||
|---|---|---|
| Washer Thickness | I.D. Number | Color Code* |
| .060 - .064" | 0 | Yellow |
| .071 - .075" | 1 | Blue |
| .082 - .086" | 2 | Red |
| .093 - .097" | 3 | Dark-brown |
| .104 - .108" | 4 | Green |
| .115 - .119" | v | Black |
| .126 - .130" | vi | Purple |
| *Oil soaked washers may discolor. Measure actual thickness. | ||
Set-up is every bit easy as 1, ii, three, and iv:
- 1. Rear Endplay: .007" to .019"
ii. Planetary Clearances: .008" to .015"
iii. Forward Clutch Hub to Straight Pulsate: .008" to .015"
4 . Front Endplay: .002" to .005" looser than rear endplay
There is an old saying: "I don't take fourth dimension to play." Simply investing a few minutes for "playtime" is vital to protect against comebacks, to ensure maximum longevity for your rebuild, and to provide ultimate satisfaction for your customers.
Randall Schroeder is a Sonnax technical specialist and fellow member of the Sonnax TASC Force (Technical Automotive Specialties Committee), a group of recognized industry technical specialists, manual rebuilders and Sonnax Industries Inc. technicians.
While Sonnax makes every effort to ensure the accuracy of technical articles at time of publication, we assume no liability for inaccuracies or for information which may become outdated or obsolete over fourth dimension.

How To Repair Th400 With No Forward Gears,
Source: https://www.sonnax.com/tech_resources/237-playing-with-transmissions-setting-total-endplay-to-prevent-th400-gear-train-failure
Posted by: gonsalestheadis.blogspot.com
0 Response to "How To Repair Th400 With No Forward Gears"
Post a Comment